Showing posts with label how to. Show all posts

Friday, July 24, 2015

Cardmaking Quick Tip


Hi all! I have a quick tip for you this morning for when you're making a card and covering the front with paper like I did with our new Mustache Birthday Card

I always cut my paper a 1/16 of an inch bigger than my card. This gives me a little bit of wiggle room when covering the cardstock. 

Add your adhesive to the back of the paper like you normally would. Now, instead of picking up the paper... pick up the card! 

Leaving the paper face down, turn your card face down and line up the edges. By using the backside, you can easily see that you are lined up all the way around before pressing down on your adhesive. 

So there you go, no more slanted papers!


Friday, December 28, 2012

Christmas Gift Layout

The presents are all opened, the food is all eaten, and you have a ton of new pictures just waiting to be scrapbooked!

Here is a quick layout for you to make that will get you started... 


Get a 12x12 piece of Christmas or Winter scrapbook paper and a coordinating piece of 12x12 cardstock. You will also need a small piece of white or cream cardstock... smooth texture would be best.

First, cut 2 - 1 1/4" strips of your coordinating cardstock and ink the edges if you like.

Next, save the bow pattern and open it in a photo-editing program, or Word. Adjust the size to 5.61" high by 7.21" wide, so the bow is 5 5/8" wide. I know, weird sizes by that's how it worked out. =0)


Print, cutout and trace the pattern onto the back of your coordinating cardstock. After cutting out the pieces to your bow, you can choose to ink the edges... this will give it a little dimension and make the layers stand out. Next, glue the pieces of your bow together.


Cut a 2 1/2" x 4" rectangle out of your white cardstock... I like to ink the edges with silver. As you can see, my silver gets a LOT of use! 

Next, write "From: Santa" on your rectangle to make it a tag. Or, you can write To: and put the name of the person or family that are the subject in your pictures.

Now it's time to put everything together!


Place one 2 1/4" from the top, and place the other 2 1/4" from the right side (or left, if that is what you prefer).

Next, WITHOUT any glue, take your tag and lay it on the page and then lay your bow over it. Get the placement of the tag that you like and glue it down. Be sure to not glue next to the edges, that way you can slide your pictures underneath when you place them.


I like to use foam adhesive or pop-dots for the bow so that it gives it extra dimension. Whether you decide to use that, or to glue it flat to the page is up to you, and great either way. Just like the tag, you just want to be sure to not glue the ends of the "ribbon" so that you can slip your pictures underneath them.

Last, but not least it's time to add in your pictures. You can either place 3 - 4" x 6" pictures like I did, or you can cut them smaller and add more photos to the page. 


I would love to see your version of this layout! Send me pics!!


*** All free layouts and patterns are provided for personal use only and copyrighted by A Scrap of Time! Do not recreate for commercial or resale purposes.


Sunday, February 20, 2011

How to make a Postage Stamp Border


A great accent to a travel page (or any page really) is a postage stamp border. You can use this type of border for your photomats, journaling square, an embellishment, or for the entire page. I have seen a postage border punch, which is great for small pieces, but it's a little too small for my taste on the larger pieces. So, here is a simple way of creating a larger border.

Start by selecting a circle in the size that you want. If you have circle punches, they work great, but if you don't, you can find many circle shapes around the house that can be traced... coins make great templates. For this example, I'm using a 3/4" circle.

Measure the circumference of your circle, and divide it in half. Mine is 3/4", so half would be 3/8". Draw a border on the BACK of your paper that is 3/8" from the edge.


Next, on each edge, find the center of your paper and mark it. Then, measure out from that center mark half the width of the circle (so in this case 3/8" again) and mark on each side. Make sure you mark on the edge of the paper... this will be important later.


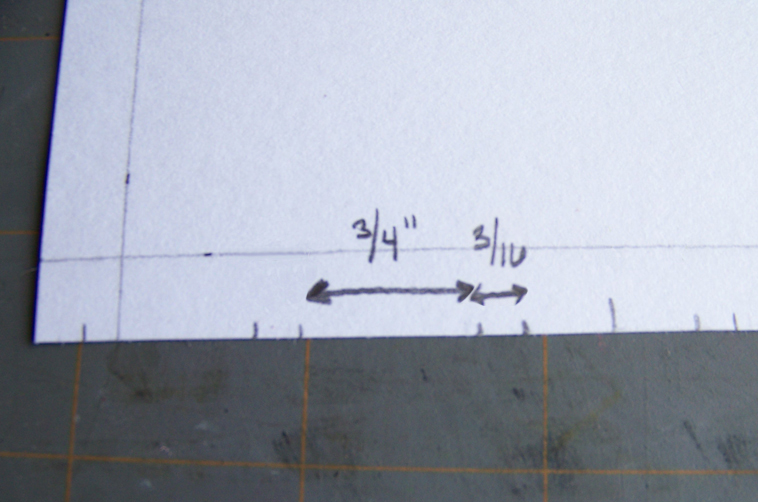
Next, working your way across the edge of your paper, measure 3/16" from the outside mark, and then 3/4" from that one. Alternate until you get to the end and can't fit anymore. Depending on the size of your paper, the 3/16" space can be adjusted to allow a decent margin at the end. (I originally used a 1/4" space, but it got me too close to the edge on the end so I had to adjust.)


Now, it's time for the fun part... cutting the circles! Center you circle between the 3/4" marks, and line up the top of the circle with your 3/8" border and punch (or trace, and then hand cut the circle). Do this around each edge, leaving the 3/16" margin in between each circle. Continue around the entire paper.


And.... voila!! Now, I usually use this size circle when doing a border around a 12x12 page, so it looks a little big on a smaller mat... but you get the idea. Find the size that you find visually appealing, and you are set!

How To Use Busy Patterns


There are some super cute papers out there, but they are so busy that sometimes it's hard to figure out how to use them. You want to make sure that your backgrounds and embellishments enhance your photos, and don't take the attention away from them. After all, the feature on your scrapbook pages should be the pictures!

Try this... if you have a paper with a busy pattern, keep it in the background by using it as borders for your page. You will help make your photograph pop by surrounding it with a simple pattern or solid color, while still getting to use the cute paper!

Memo Board with Rose Magnets

Oh, I love this! Maybe I would actually look at my calender/memo board if it was this pretty! You can get the complete tutorial over at On My Side of the Room.

Leftover Embellishments into... Super Cute Hair Clips?

Yep! I showed you how to store those little embellishments, but what if you only have a couple left and you don't want to store them, you want to use them for something? Is there a little girl you know? If so, make her a super cute hair clip!

First I found some random clips that I had in the drawer. (My daughter does not ever manage to come home from school with both clips in her hair, so as you can see there is only one set, and a bunch of singles.)Then I found rhinestones, and other embellishments, and went to work.

Hairclip How To

I used E6000 Industrial Strength clear adhesive to glue the rhinestones and the snowflakes. To glue the flowers, I used regular hot glue. The snowflakes are actually leftover brads. To use them for the clips, I simply snipped off the "brad" parts on the back with wire cutters. Be sure to let the adhesive completely dry before opening the clips, or the embellishments will pop off.

Hairclips How To

Hairclips How To

I think they turned out really cute, and my daughter loves them!