A great accent to a travel page (or any page really) is a postage stamp border. You can use this type of border for your photomats, journaling square, an embellishment, or for the entire page. I have seen a postage border punch, which is great for small pieces, but it's a little too small for my taste on the larger pieces. So, here is a simple way of creating a larger border.
Start by selecting a circle in the size that you want. If you have circle punches, they work great, but if you don't, you can find many circle shapes around the house that can be traced... coins make great templates. For this example, I'm using a 3/4" circle.
Measure the circumference of your circle, and divide it in half. Mine is 3/4", so half would be 3/8". Draw a border on the BACK of your paper that is 3/8" from the edge.

Next, on each edge, find the center of your paper and mark it. Then, measure out from that center mark half the width of the circle (so in this case 3/8" again) and mark on each side. Make sure you mark on the edge of the paper... this will be important later.

Next, working your way across the edge of your paper, measure 3/16" from the outside mark, and then 3/4" from that one. Alternate until you get to the end and can't fit anymore. Depending on the size of your paper, the 3/16" space can be adjusted to allow a decent margin at the end. (I originally used a 1/4" space, but it got me too close to the edge on the end so I had to adjust.)
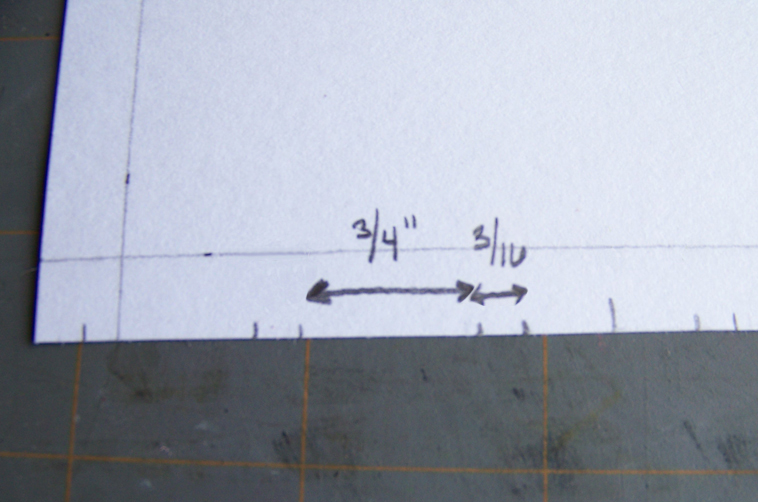
Now, it's time for the fun part... cutting the circles! Center you circle between the 3/4" marks, and line up the top of the circle with your 3/8" border and punch (or trace, and then hand cut the circle). Do this around each edge, leaving the 3/16" margin in between each circle. Continue around the entire paper.

And.... voila!! Now, I usually use this size circle when doing a border around a 12x12 page, so it looks a little big on a smaller mat... but you get the idea. Find the size that you find visually appealing, and you are set!